
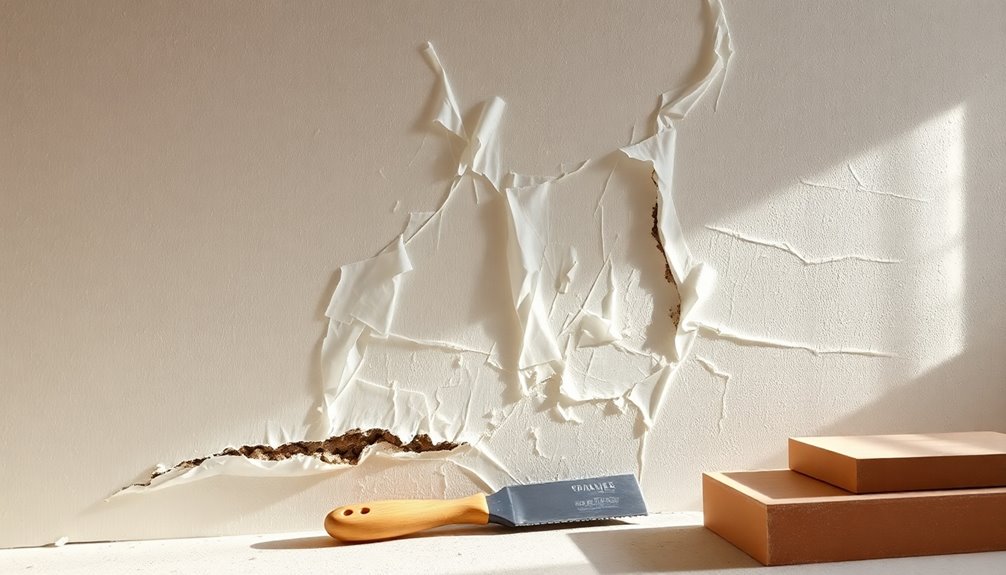
If you’ve got bubbling tape on your drywall, don’t panic! You can fix it without redoing the whole room. Start by cutting away the bubbled sections and cleaning the area. Apply joint compound under the tape for better adhesion, then feather it out over the top. Once dry, sand it lightly and prime before painting. Regular maintenance helps prevent future issues, and there’s more involved in achieving a smooth finish.
Understanding the Causes of Bubbling Tape
When it comes to bubbling drywall tape, several factors can lead to this frustrating issue. Insufficient mud application behind the tape often results in poor adhesion, causing layers to separate.
Moisture damage can worsen bubbling, especially in humid areas or those exposed to water. Temperature fluctuations during the drying process can also impact adhesion, making the tape more prone to bubbling.
Moisture and temperature fluctuations can exacerbate bubbling issues in drywall tape, compromising adhesion and leading to unsightly damage.
Additionally, improper installation techniques, such as applying tape backward or using inadequate joint compound, contribute to these problems. To prevent recurring issues, it’s essential to conduct regular inspections and address underlying factors like moisture or settling. By understanding these causes, you can take steps to avoid future bubbling in your drywall projects. The importance of moisture-wicking technology in preventing damage in other materials underscores how crucial it is to control moisture in your environment.
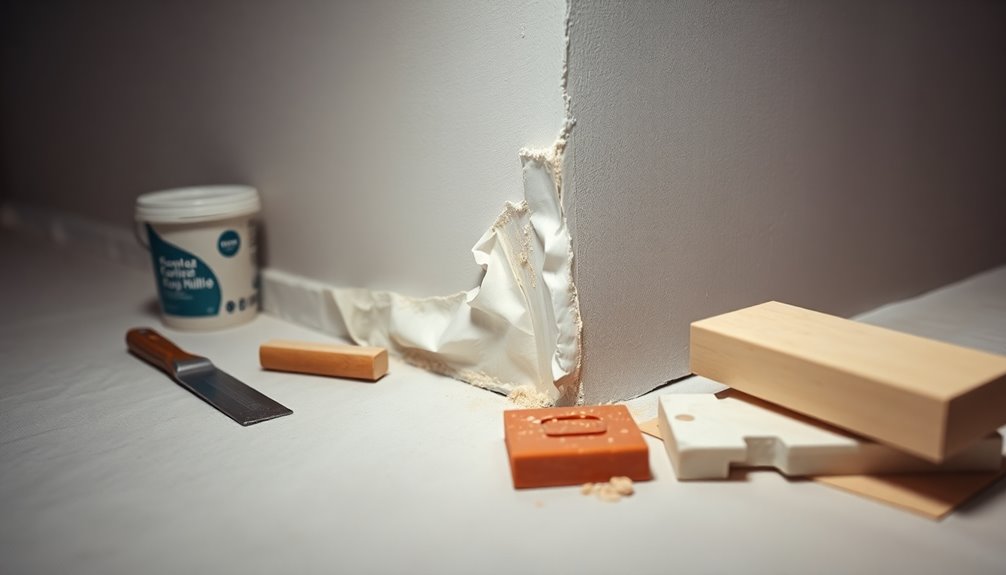
Essential Tools for Repairing Drywall

To effectively repair drywall, you’ll need some essential tools by your side. Having the right joint compound, putty knives, and safety gear can make all the difference in your project. Additionally, utilizing expense management apps can help you keep track of the costs associated with your repairs. Let’s break down the must-have repair tools and recommend the best products for a smooth finish.
Must-Have Repair Tools
Repairing drywall effectively requires a few essential tools that streamline the process and guarantee a professional finish.
Start with lightweight joint compound and a mixing bucket for better control while preparing your material. A drill mixer attachment can help you achieve the desired texture quickly.
For application, you’ll need a set of putty knives and taping knives, typically a 6-inch and a 10-inch. After applying the joint compound, a sanding kit with screens in various grits is crucial for smoothing the repaired areas.
To minimize cleanup, consider a drywall hand sander kit with a shop vac connection for dust reduction. Don’t forget your protective gear, like safety goggles and a breathing mask, to keep yourself safe while you work.
Essential Safety Gear
Before you start fixing that bubbling drywall tape, it’s important to gear up properly. Safety should be your top priority during this repair session.
Here are three essential safety gear items you need:
- Breathing mask: Protect your lungs from harmful dust and particles generated during sanding and mudding.
- Protective eyewear: Shield your eyes from dust and debris, especially while sanding or cutting drywall materials.
- Drywall hand sander kit: Invest in one with a shop vac connection to keep your workspace cleaner and minimize dust spread.
Don’t forget to have a variety of putty knives and taping knives on hand, along with joint compound, for effective application.
Staying safe guarantees a smooth repair process!
Recommended Joint Compound Types
Choosing the right joint compound is essential for a successful drywall repair. Lightweight joint compounds, like the blue lid variety, are perfect for minimizing bubbling during application. They’re easier to apply and sand, guaranteeing you achieve a smooth finish.
If you’re in a humid area, opt for moisture-resistant formulas to enhance adhesion and durability. Thinning your joint compound to a pancake batter consistency can also improve your skim coating process.
Use taping knives of various sizes—especially 6-inch and 10-inch—to guarantee even coverage over seams.
Finally, for efficient smoothing of dried joint compound, invest in sanding screens and hand sanders. These tools help you maintain control and achieve a dust-free environment during cleanup.
Step-by-Step Guide to Fixing Bubbling Tape
Fixing bubbling drywall tape doesn’t have to be an intimidating task. Just follow these simple steps:
- Cut Away Bubbling Sections: Use a utility knife to carefully remove the bubbling tape, ensuring you don’t damage the surrounding drywall surface.
- Apply Joint Compound: Using a putty knife, apply a layer of joint compound beneath the tape to help it adhere and fill any gaps.
- Feather and Finish: Once dry, add a thin layer of joint compound over the tape, feathering it out for a smooth finish.
After it’s fully dry, sand the area with a sanding block to avoid damaging the tape. Additionally, ensure that the area is free from moisture issues, as moisture problems can undermine the integrity of your drywall repair.
Finally, prime the area to achieve a uniform appearance before painting. Your repair will look seamless!
How to Properly Skim Coat for a Smooth Finish
To achieve a smooth finish when skim coating, you’ll need some essential tools and a solid step-by-step approach. It’s important to be aware of common mistakes that can undermine your efforts, so let’s break it down. With the right techniques, you can create a flawless surface ready for paint. Additionally, exploring energy-efficient models can enhance your home’s overall functionality, making it a worthwhile consideration during renovations.
Essential Tools Needed
When you’re ready to skim coat for a smooth finish, having the right tools on hand is essential.
Start by gathering these essential tools:
- Joint Compound and Mud Pan: Use lightweight joint compound, thinned to a pancake-like consistency for easier application.
- Putty Knives: Have various sizes, specifically 6-inch and 10-inch, to apply thin layers of mud effectively.
- Sanding Tools: A hand/pole combo sander allows you to reach different areas; don’t forget to wear protective gear to manage dust.
After your project, always clean your tools immediately to prevent buildup and maintain a tidy workspace.
With these tools in hand, you’ll be prepared to tackle that skim coat with confidence!
Step-by-Step Application Process
Skim coating your walls can transform a tired surface into a smooth canvas, and following a systematic approach makes all the difference.
Start by thinning lightweight joint compound with water until it resembles thin pancake mix for easy application. Use a variety of taping knives, ideally 6-inch and 10-inch, to apply the skim coat.
Begin at the top corner and work down in thin, even layers, ensuring proper feathering at the edges for a seamless changeover. After drying, sand the surface with a hand sander and sanding screens for a fine finish.
Finally, apply a high-quality primer to enhance adhesion and expose any imperfections that may need touch-ups, ensuring a flawless base for painting your drywall.
Common Mistakes to Avoid
While applying a skim coat might seem straightforward, several common mistakes can lead to an uneven finish.
Avoid these pitfalls to guarantee a smooth result:
- Wrong Consistency: Make sure your joint compound is mixed to a thin consistency, like pancake batter. This helps minimize bubbles during skim coating.
- Improper Application: Use a wide taping knife and apply a thin layer from top to bottom. This prevents excessive buildup and overlapping edges.
- Neglecting Preparation: Always use a high-quality primer on the drywall surface before skim coating. It seals and reduces the chances of imperfection and bubbling.
Remember to sand lightly between coats and inspect under bright light to catch any imperfections before applying the final coat of paint for a flawless finish.
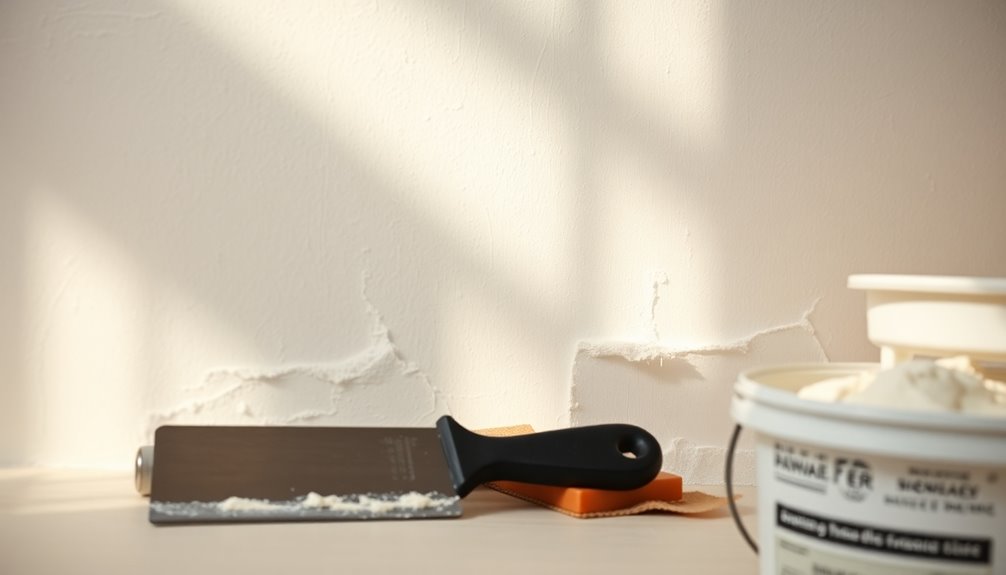
Tips for Priming and Painting After Repairs
To achieve a professional-looking finish after repairing bubbling drywall tape, it’s essential to prioritize priming the area properly.
Always use a high-quality primer on newly repaired joints to enhance paint adhesion and guarantee a uniform finish, especially after skim coating. Avoid paint and primer combo products, as they often underperform. Instead, consider a water-based, low-odor peel stop sealer to prevent bubbling from weak or peeling paper.
Before applying primer, take the time to inspect and sand the repaired areas thoroughly. This step guarantees a smooth surface, as any imperfections can become more noticeable after painting.
Finally, allow adequate drying time for the primer to prevent issues like bubbling or peeling during the paint application. Additionally, understanding historical data analysis can help you better anticipate and mitigate future repair needs by identifying common issues in your drywall projects.
Maintaining Your Drywall to Prevent Future Issues
Maintaining your drywall is essential for preventing future issues, especially if you want to avoid complications like bubbling or peeling.
Here are three key practices to keep your drywall in top shape:
- Regular Inspections: Check for signs of damage, such as bubbling or peeling, and address them promptly to prevent further deterioration.
- Humidity Control: Maintain stable humidity levels and proper ventilation to minimize moisture damage and tape failure.
- Quality Materials: Use high-quality joint compounds and seal drywall paper effectively, especially when applying a Level 5 finish in well-lit areas to enhance appearance and drywall integrity. Additionally, consider insulating pipes in unheated crawl spaces to prevent frozen pipes and potential water damage that could affect your drywall.
Conclusion
In the end, tackling a bubbling tape job doesn’t have to feel like climbing a mountain. With the right tools and a little patience, you can restore your drywall to its former glory. Remember, prevention is key—keep an eye on your walls to avoid future mishaps. So roll up your sleeves, get to work, and soon enough, your walls will be smooth and ready for a fresh coat of paint. Happy repairing!


Average Rating