If you’ve got a hole in the top of your water heater, fixing it could save you money and restore efficiency. First, assess the damage: look for signs of corrosion and water pooling. Gather materials like high-temperature epoxy and a putty knife. Clean around the hole, apply the sealant, and allow it to cure. Regular maintenance can prevent future issues. Want to know how to reinforce your repair and what else to watch out for?
Understanding the Causes of Holes in Water Heaters
Corrosion is the enemy of water heaters, often leading to holes that can cause significant issues. It typically occurs due to sediment buildup or lack of maintenance.
If you neglect your water heater, the top can develop holes from the tank’s deterioration, especially when exposed to moisture or wet insulation. Environmental factors, like high humidity or poor water quality, can speed up the rusting process, making it essential to keep an eye on your unit.
A malfunctioning anode rod, which helps prevent corrosion, can also contribute to this problem if it’s not replaced regularly. Regular maintenance and monitoring of expense tracking tools can help ensure that you allocate resources effectively for repairs and replacements.
Assessing the Damage: Is Repair Possible?
To determine if your water heater can be repaired, start with a visual inspection of the damage.
Look for the size of the hole and signs of corrosion, as these factors play a big role in whether a simple fix is feasible.
If you’re unsure, consulting a professional can save you time and money in the long run. Additionally, understanding how expense categorization can impact your financial decisions may help you weigh the cost of repair versus replacement.
Visual Inspection Techniques
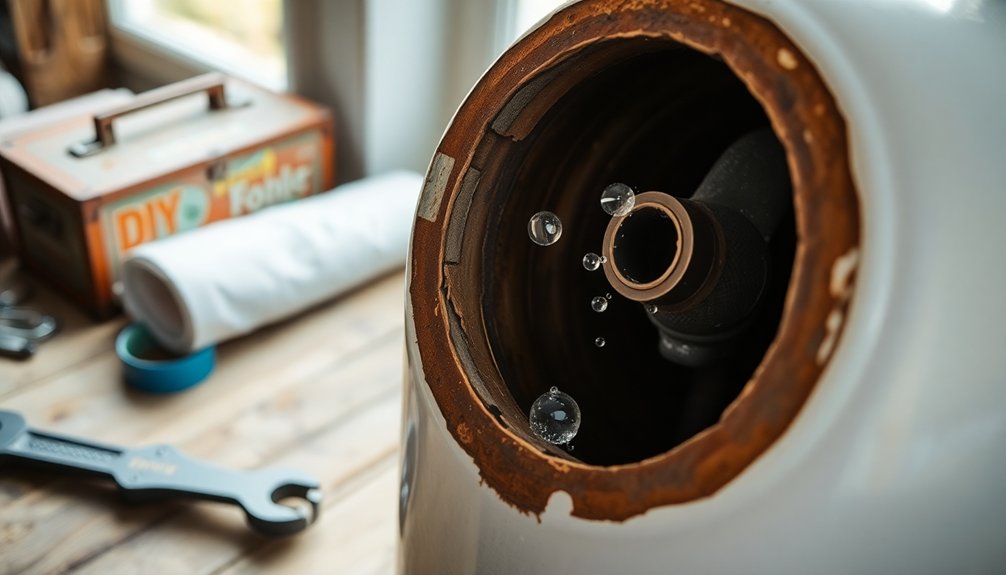
While you may hope for a simple fix, a thorough visual inspection of your water heater is essential to determine if repair is possible.
Begin by checking the top for signs of rust or corrosion, which could indicate a compromised tank. Look for any water pooling or dripping from the hole; this helps assess the damage’s severity.
Use a flashlight to closely examine the area around the hole for additional cracks or weak spots. Don’t forget to check the insulation for wetness, as it may signal internal leaks.
Document your findings with photos or notes, as this information will be valuable in deciding on repair options or if you need professional assistance to handle the hot water issue.
Assess Repair Feasibility
After completing your visual inspection, it’s time to assess whether the damage is repairable.
Start by examining the size of the hole; small ones might be fixable with sealants, but larger holes often raise safety concerns and require tank replacement.
Next, check for rust or corrosion, as these can compromise the tank’s integrity.
Consider the water heater’s age too; if it’s nearing the end of its lifespan (10-15 years), repair costs may not justify the effort.
Also, think about the hole’s location—top leaks are less critical than bottom leaks, which can cause extensive damage.
Consulting a plumbing technician for a professional evaluation can help you decide on long-term solutions.
Materials Needed for Repairs
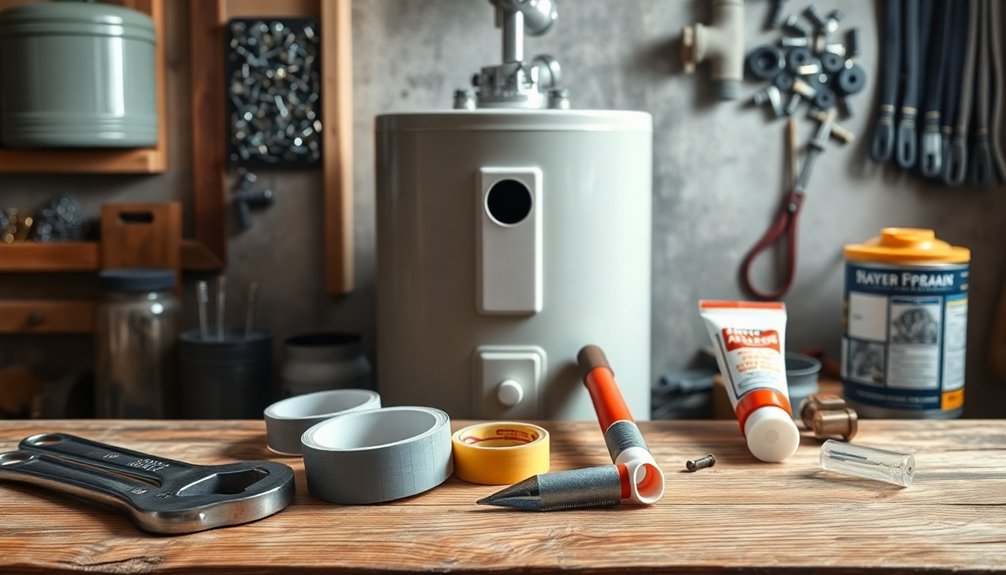
When tackling repairs on your water heater, having the right materials is essential for a successful fix. You’ll need waterproof sealant types or a waterproof epoxy specifically designed for metal surfaces.
For larger holes, consider repair materials options like a patching kit that includes a fiberglass patch and resin, offering a durable solution.
Be sure to have sandpaper or a wire brush handy to clean the area around the hole, ensuring better adhesion of the repair materials. A putty knife will help you apply and smooth out the epoxy or sealant for a watertight seal.
Finally, don’t forget to wear safety gear, including gloves and goggles, to protect yourself from chemicals and debris during the repair process. Additionally, having a good understanding of expense tracking apps can help you budget for home repairs effectively.
Step-by-Step Guide to Patching the Hole
To patch the hole in your water heater, you’ll need a few key materials and a clear procedure.
Start by gathering high-temperature epoxy or a specialized patch kit, along with cleaning supplies for the area around the hole. Using effective tools like expense management apps with receipt scanning technology can help streamline your budgeting process, ensuring you have the funds for necessary repairs.
Following the steps carefully will guarantee a reliable and effective repair.
Materials Needed for Patching
Patching a hole in your water heater requires just a few essential materials to guarantee a durable fix.
First, you’ll need a metal patch or a piece of sheet metal, cut to extend at least one inch beyond the hole on all sides.
Next, gather waterproof adhesive options or sealants to guarantee a watertight seal.
Self-tapping screws or rivets are vital for securely fastening the metal patch in place.
Before you start, make certain the area around the hole is clean and dry for proper adhesion.
These materials will allow you to effectively use metal patching techniques to repair your water heater and prevent leaks in the future.
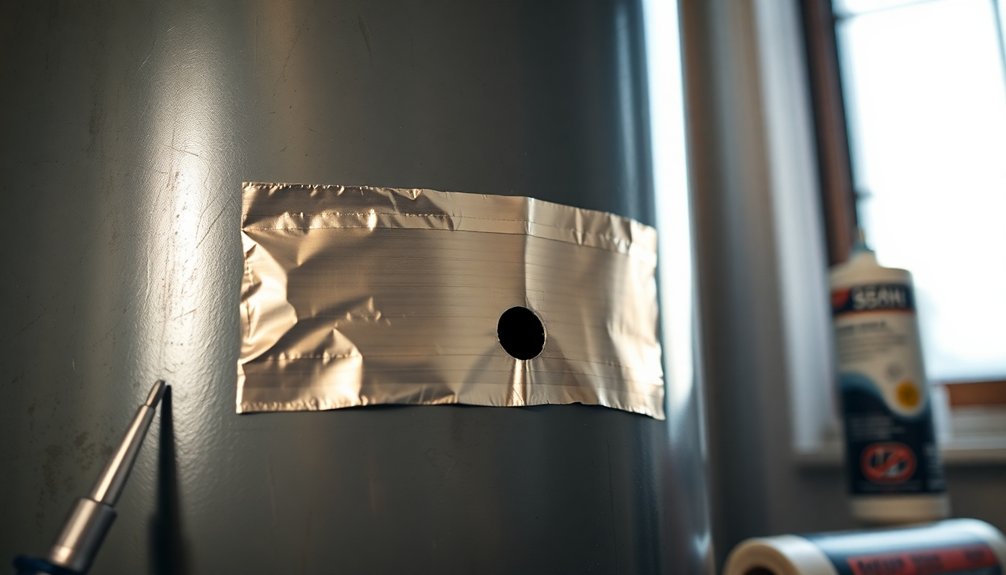
Patching Procedure Steps
Before you plunge into fixing that hole in your water heater, make sure the power and water supply are turned off for your safety.
Start by cleaning the area around the hole with a wire brush to eliminate rust and debris, ensuring better adhesion.
Depending on the hole’s size, choose your patch types wisely—opt for a metal patch for larger holes, secured with screws. For smaller holes, select a suitable epoxy or sealant option designed for metal repairs.
Apply the sealant generously over the hole, smoothing it out for a watertight seal.
Finally, allow the patching material to cure completely according to the manufacturer’s instructions before restoring power and water supply.
Reinforcing the Repair: When and How
When it comes to reinforcing a repair on your water heater, using the right materials is essential for ensuring a lasting solution.
Start with epoxy selection tips: choose a high-quality sealant made for metal surfaces to achieve a watertight bond.
Choose a high-quality epoxy sealant designed for metal to ensure a reliable, watertight bond for your repair.
Consider these patching techniques overview:
- Apply a sturdy metal sheet patch over the hole.
- Secure it with screws or adhesive for added structural support options.
- Clean the area thoroughly to enhance adhesion.
After reinforcing, keep an eye on the repair for any signs of leaks or deterioration. Additionally, utilizing bill tracking tools can help ensure you’re financially prepared for any future repairs or maintenance needs.
Preventative Measures to Avoid Future Leaks
To prevent future leaks in your water heater, it’s crucial to take proactive steps that guarantee the system remains in top condition.
Start by establishing a maintenance schedule for routine inspections, ensuring the temperature and pressure relief valve is functioning properly. If you notice any signs of leakage, prioritize valve replacement to avoid water damage.
Regularly drain and flush the water heater to identify potential issues like sediment buildup, which can lead to leaks. Use high-quality brass valves for drain connections instead of plastic ones, as they’re more durable.
Insulate pipe connections and check for corrosion or wear, as these areas often become leak sources.
Finally, consider installing a diaphragm-type expansion tank to manage pressure fluctuations effectively. Additionally, adopting sustainable delivery practices when purchasing replacement parts can contribute to overall environmental responsibility.
When to Call a Professional
How do you know when it’s time to call in a professional for your water heater issues? Watch for these signs of failure:
- Significant rust or corrosion around the hole, indicating potential inner tank issues.
- Persistent leaks that resist your sealing efforts, risking further water damage.
- Difficulty reaching the hole or lacking the right tools for a proper fix.
If you encounter any of these situations, it’s best to consult a technician to avoid costly emergency repairs down the line. While professional costs may seem intimidating, they guarantee the job’s done right, keeping your home safe and compliant with local regulations. When in doubt, a professional inspection provides clarity on whether repair or replacement is necessary. Additionally, clear communication of your issues can help the technician assess the situation more effectively.
Conclusion
In the journey of homeownership, a water heater’s hole can symbolize unexpected challenges. By patching it up, you’re not just repairing a device; you’re reinforcing your resilience. With the right materials and a bit of effort, you can restore warmth and comfort to your home. Remember, every repair is a step toward mastery, transforming a simple appliance into a demonstration of your resourcefulness. So, embrace the challenge and keep your home safe and sound.